
您将在此骷髅头绘图教程中学到什么
- 如何绘制人类头骨草图
- 如何绘制人类头骨细节
- 如何完成骷髅头图并为其着色
1. 如何绘制人类头骨图的基础
步骤 1
让我们通过画一个圆来开始这个头骨绘制的分步教程。它不需要完美,可以随意用许多线条绘制它。也找到它的中心。稍后您将能够完善您的头骨草图。

步骤 2
在圆的下方画一条线,使用其半径的长度。

步骤 3
将此行分为三个部分。一旦标记了不同特征的位置,头骨绘图就很容易了。

步骤 4
通过在圆圈下方绘制一个方形“桶”,为下颌创建头骨轮廓。
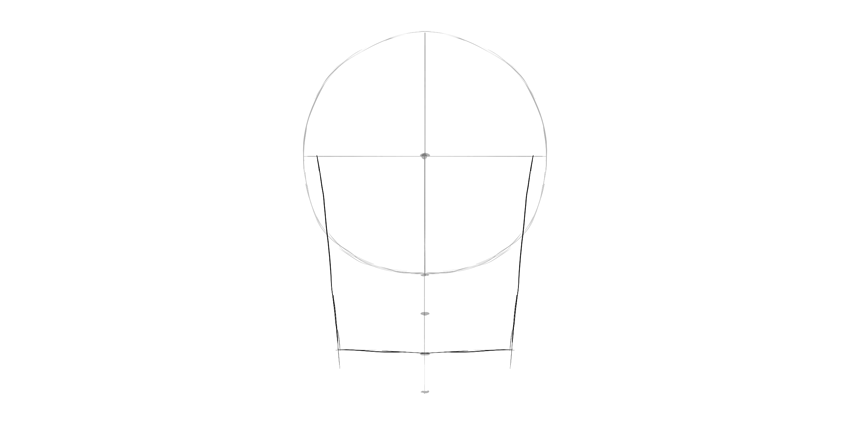
步骤 5
在头骨轮廓的底部三分之一处画出两个椭圆形。这将是下巴。

步骤 6
将椭圆与其余线连接起来。

步骤 7
在圆的下半部分画出两个巨大的倾斜椭圆形。

步骤 8
这些椭圆形还不是眼窝——它们的形状太简单了。让我们来修复它。画一条穿过两个椭圆形的曲线,为眉毛区域留出一些空间。

步骤 9
将此曲线与颅骨轮廓的两侧连接起来。

步骤 10
在底部绘制另一条曲线,在下面留出类似的空间。

步骤 11
您现在可以通过在两侧给眼窝一些空间来勾勒出眼窝的轮廓。

步骤 12
从眼眶角向另一个眼窝画一条曲线,穿过下巴。这将是嘴巴区域。

2. 如何绘制人类头骨细节
步骤 1
现在我们准备将这个简单的骷髅头图提升到一个新的水平。在圆圈底部的眼窝之间画一个泪滴形状。这将是鼻子。
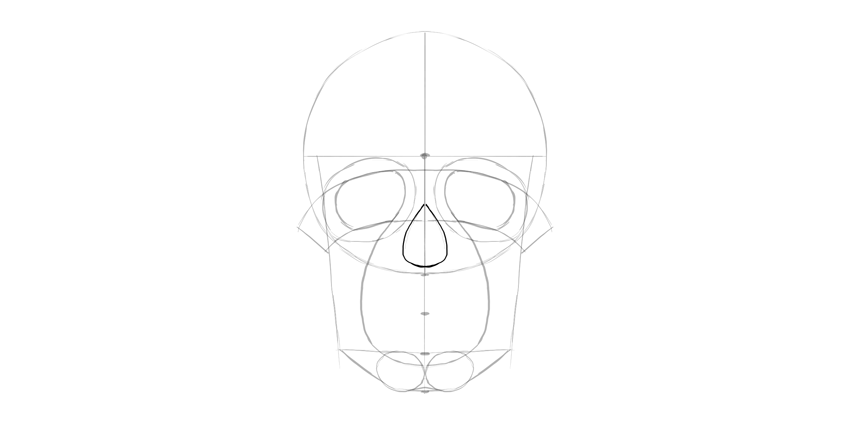
步骤 2
让鼻子更细致。

步骤 3
在嘴巴上画一条曲线,穿过前三分之二之间的标记。
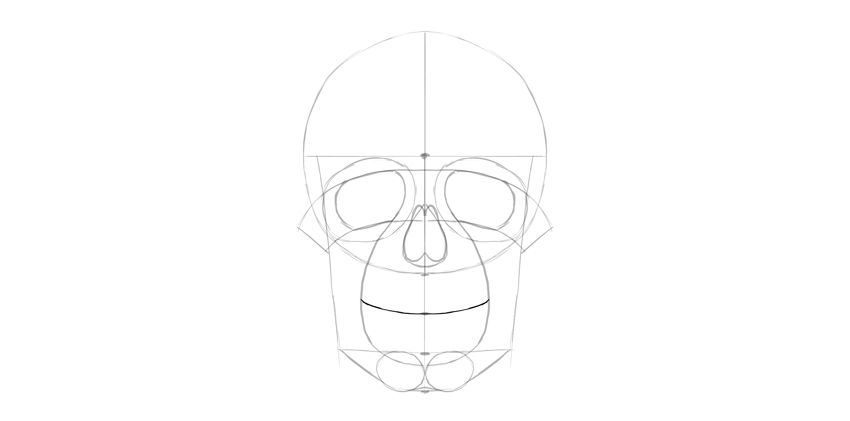
步骤 4
我们需要在嘴巴上添加更多细节。首先,用两条曲线定义上颌的前部。

步骤 5
画出下牙的边界。

步骤 6
将牙齿区域连接到下巴。

步骤 7
现在画上牙的边界。

步骤 8
用这些曲线完成牙齿区域的边界。

步骤 9
我们还需要将细节添加到下颌。


步骤 10
将最后的曲线添加到头骨上。

步骤 11
将牙齿区域分成单独的牙齿。现在它看起来更像是头骨的草图。

3. 如何完成和着色骷髅头
步骤 1
让我们完成人类头骨的绘制。如果你是传统绘画,你可以在上面放一张新纸,或者现在干脆用较暗的媒介画画。
勾勒出眼窝的轮廓。
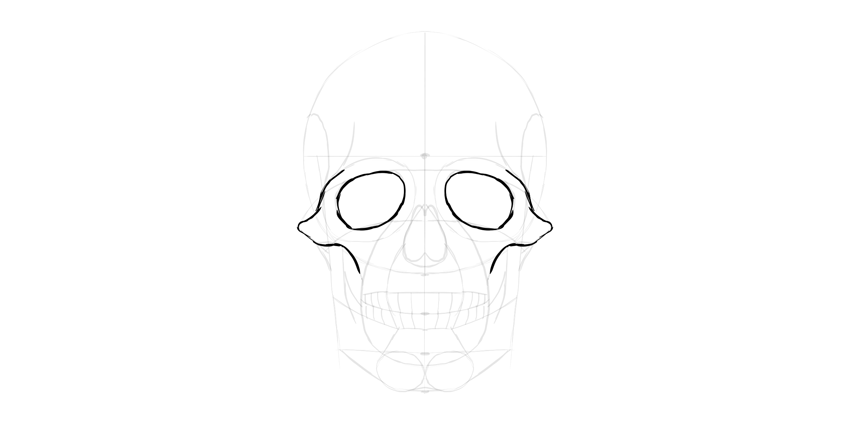
步骤 2
勾勒出鼻子的轮廓。别忘了顶部的鼻梁。

步骤 3
为眼窝边缘添加更多细节。

步骤 4
勾勒出牙齿的轮廓。它们向骨骼略微变细。

步骤 5
在牙齿下方和上方添加一些细节。

步骤 6
勾勒出下颌的轮廓。

步骤 7
勾勒出颅骨的上部轮廓。

步骤 8
这已经从简单的头骨图变成了更详细的东西!如果您想更准确,请添加更多花哨的细节。

步骤 9
如果需要,可以对绘图进行着色。首先使最黑暗的部分变暗……


…然后对阴影区域进行剖面线。

最后,加粗一些线条,使效果更加醒目。就是这样——你的画就完成了!